
Matcha Green Tea Preparation: A Step-by-Step Guide

You've bought a vivid green powder, tipped a teaspoon into a mug, added boiling water from the kettle and ended up with something lumpy, bitter and oddly weak all at once. That result isn't usually a bad purchase. It's an unweighed serve, water that's too hot and a cup that gives the whisk nowhere to move. Good matcha green tea preparation starts from one fact you can control: matcha is powdered leaf you consume whole, not leaves you steep and remove. Every gram you add stays in the drink, so grams set flavour, texture and caffeine together. Weigh the serve, keep the water below boiling and repeat the same numbers, and the bowl stops changing from day to day.
Table of Contents
- Matcha Amounts and Water Temperatures for Each Drink
- Tools You Need and Which Substitutes Work
- How to Whisk Traditional Matcha Step by Step
- Making Matcha Lattes and Iced Drinks
- Fixing Lumps, Bitterness and Weak Foam
- Choosing Grade and Baking with Culinary Matcha
Matcha Amounts and Water Temperatures for Each Drink
Start with usucha, the thin whisked bowl most home drinkers make daily. I would weigh 1-2 g of matcha, add 60-70 mL of water at 70-80°C and treat that as your reference serve. It's light enough to sip straight, concentrated enough to show the powder's colour and sweetness, and quick to adjust by 0.5 g if the first bowl tastes thin or overpowering.
Koicha, the thick style, moves in the opposite direction: 3-4 g in only 30-40 mL of water, so the texture is dense and the taste intense. Koicha is kneaded into a smooth, glossy paste, so stale or poor powder has nowhere to hide.
Weighing Each Format the Same Way
| Drink | Matcha | Water or milk | Water temperature |
|---|---|---|---|
| Usucha (thin whisked tea) | 1-2 g | 60-70 mL water | 70-80°C |
| Koicha (thick whisked tea) | 3-4 g | 30-40 mL water | 70-80°C |
| Culinary baking | 1-3 g, per recipe | 15-20 mL warm liquid to dissolve, then recipe liquid | 60-70°C |
Lattes and iced drinks follow the same principle: a small weighed concentrate sets the strength before milk or ice dilutes it.
A teaspoon can't give you this control. Heaped and level scoops differ a lot, and sifted powder packs down differently from powder taken straight from the pouch, so two scoops that look identical can be several grams apart. That gap is why a recipe written only as a cup volume is incomplete for matcha green tea preparation: it leaves the variable that decides strength, texture and caffeine unmeasured.
The caffeine follows the same logic. A steeped cup leaves part of the leaf's caffeine behind in the spent leaves, while a 2 g matcha serve delivers everything the powder holds, so heavier serves scale quickly and a strong bowl can reach well past what the same volume of infused tea would give you. Australian health guidance treats matcha as a caffeine source that counts toward daily limits during pregnancy and breastfeeding, so if you're in that group, weigh and log each serve and count coffee, tea, chocolate and energy drinks from the same day. Product labels and personalised medical advice matter more than a generic claim about smoother energy.
Practical rule: Weigh your first bowl on a 0.1 g scale, write down the grams, water volume and temperature, and change only one variable next time.
If temperature is the part you keep guessing, use our guide to matcha brewing temperature and kettle settings to settle on a repeatable method for getting into the 70-80°C range. Don't chase a stronger drink by boiling the water harder. Add powder in half-gram steps if you want more intensity, and keep the temperature steady so you know what changed.
Tools You Need and Which Substitutes Work
Three tools do the essential work before anything decorative earns bench space. A fine sieve breaks up clumps while the powder is still dry. A 0.1 g digital scale fixes the dose, and the dose is what sets flavour, texture and caffeine in every serve. A bamboo chasen with intact tines disperses the powder and builds foam. Skip the sieve and the whisk has to do two jobs at once. Skip the scale and every other variable becomes noise, because you never know how much powder was in the bowl.
The Core Kit
- Wide chawan: A broad tea bowl gives the chasen room for a fast W pattern. A narrow mug restricts the stroke, leaves powder at the edges and makes fine foam much harder.
- Bamboo chashaku or small spoon: Useful for moving powder to the sieve, but the scale decides the final amount.
- Thermometer or variable-temperature kettle: Helps you land at 70-80°C without pouring boiling water and hoping it has cooled enough.
- Small jug or measuring cup: Keeps water and milk volumes consistent, especially when you're building a concentrate for lattes.
Substitutes can work, but each one changes the drink. An electric milk frother on low blends a smooth concentrate and produces usable foam, although the texture comes out coarser than a chasen's. A lidded jar can shake matcha concentrate through cold milk for an iced drink, but it won't create the fine, even foam you want on a whisked bowl. A small kitchen whisk is the weakest substitute because its wires are too sparse to break fine clumps evenly. If you're comparing workarounds, our overview of matcha whisk alternatives and their limits sets out what each one can realistically do.
Pre-sweetened powder removes one variable, but it raises the stakes on weighing. Premium Sweet Matcha 200g is a pre-sweetened blend that is sweet, smooth and mild with no bitterness, and it suits lattes, iced matcha and smoothies. The sweetness is fixed per gram, so a heavy scoop makes a sweeter drink and a heavier caffeine dose at the same time. Weigh it the same way you would pure matcha.
Care for the chasen after every use. Rinse it in clean warm water, gently shake off the excess and let it dry fully with the tines open before storing it. Don't leave it soaking, press it into a narrow container or put it away damp. Bent, broken or mouldy tines won't aerate properly, and you'll start blaming the powder for a tool problem.
How to Whisk Traditional Matcha Step by Step
A consistent usucha starts with a scale, not a scoop. Weigh approximately 1-2 g, sift it into a wide bowl, add 30-60 mL of water at roughly 70-80°C, and whisk in a rapid back-and-forth W or M motion until no dry pockets remain and a fine foam forms. I set the default serve at the fuller end of that range, 2 g with 60-70 mL, because it gives a first-time whisker enough flavour to judge and adjust. A teaspoon measured by eye drifts with every pack and pour, while 2 g on a scale is 2 g every time. Caffeine content also varies between grades and batches, so specifying powder mass rather than cup volume is the reliable way to keep two bowls comparable.
The graphic below condenses the physical sequence before the detailed steps explain where each one can drift.
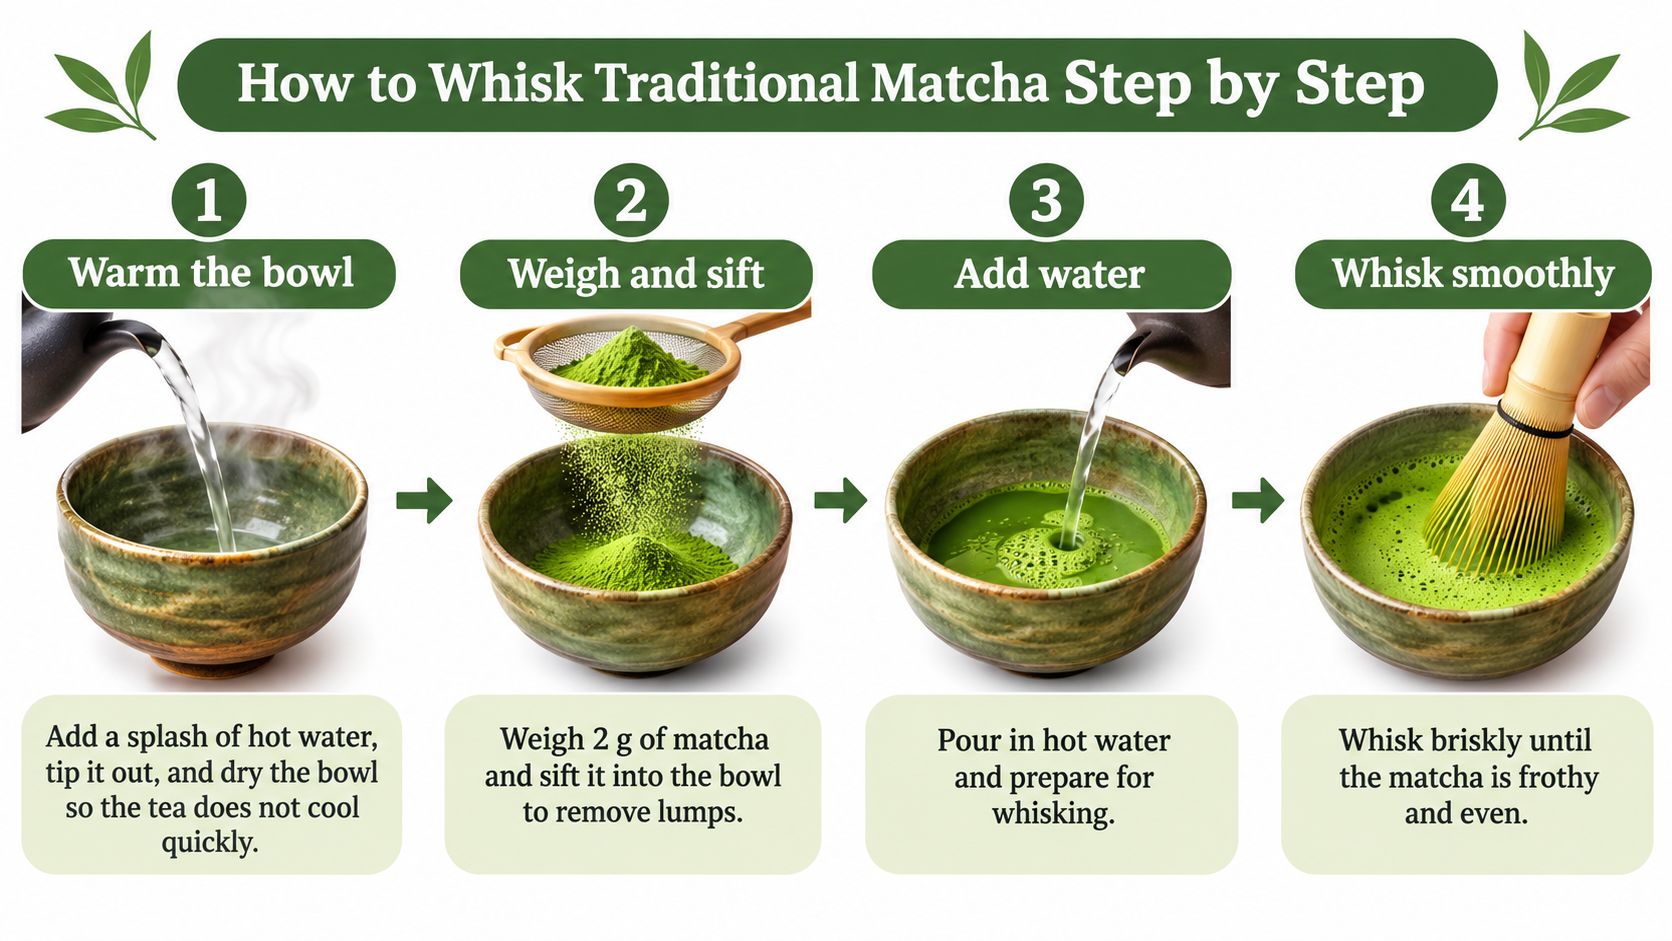
The Six Step Workflow
- Warm the bowl: Add a splash of hot water, swirl it once, tip it out and dry the bowl. A cold bowl pulls heat from a small serve quickly, while leftover water dilutes the powder before you've measured the quantity.
- Weigh and sift 2 g: Push the powder through a fine sieve directly into the warm bowl. Unsifted clumps stay hydrophobic: the outside wets while the centre stays dry, and even energetic whisking leaves gritty texture and uneven flavour behind.
- Add 60-70 mL of water at 70-80°C: Pour steadily over the powder, not down one side of the bowl. Boiling water increases the thermal load, can accentuate bitterness and flatten delicate aromatic notes, while this range balances dispersion, drinkability and flavour preservation.
- Whisk in a W or M motion for 20-30 seconds: Move from the wrist, keep the chasen travelling across the surface and cover the whole bowl rather than stirring in circles. The window is a working guide: stop when the foam turns fine and no dry streaks remain along the surface.
- Smooth the surface: Slow down for a few gentle strokes across the top to break large bubbles and draw the foam into an even layer. Treat the foam as a visual dispersion indicator, a texture cue rather than a verdict on the powder's quality.
- Drink promptly: Sip within a few minutes while the foam is fine, the colour is bright and the powder remains suspended. Matcha settles as it stands, so the final mouthful of a forgotten bowl will taste heavier and more bitter than the first.
Keep the whisk light and fast. Pressure against the base feels thorough, but it bends the tines and gives you less foam.
If a first bowl disappoints, check the stroke before blaming the powder. Big circular strokes, the motion you'd use to beat an egg, push liquid around the bowl without shearing the clumps apart. Short, rapid back-and-forth travel does the actual dispersing work. The second common slip is order of operations: once water hits unsifted powder, the clumps form wet shells that resist breaking, so the sieve step has to happen before the pour.
A good usucha looks vivid green, carries a fine and even foam, and leaves no grit on your tongue. The flavour should be full but not harsh, with sweetness and umami arriving before any bitterness. If the colour is dull or yellow, suspect old powder or excessive heat before you change the dose. If the drink is smooth but weak, keep the water and temperature fixed and add 0.5 g next time. That measured change tells you whether the serve was under-dosed or whether the powder itself lacks intensity.
Making Matcha Lattes and Iced Drinks
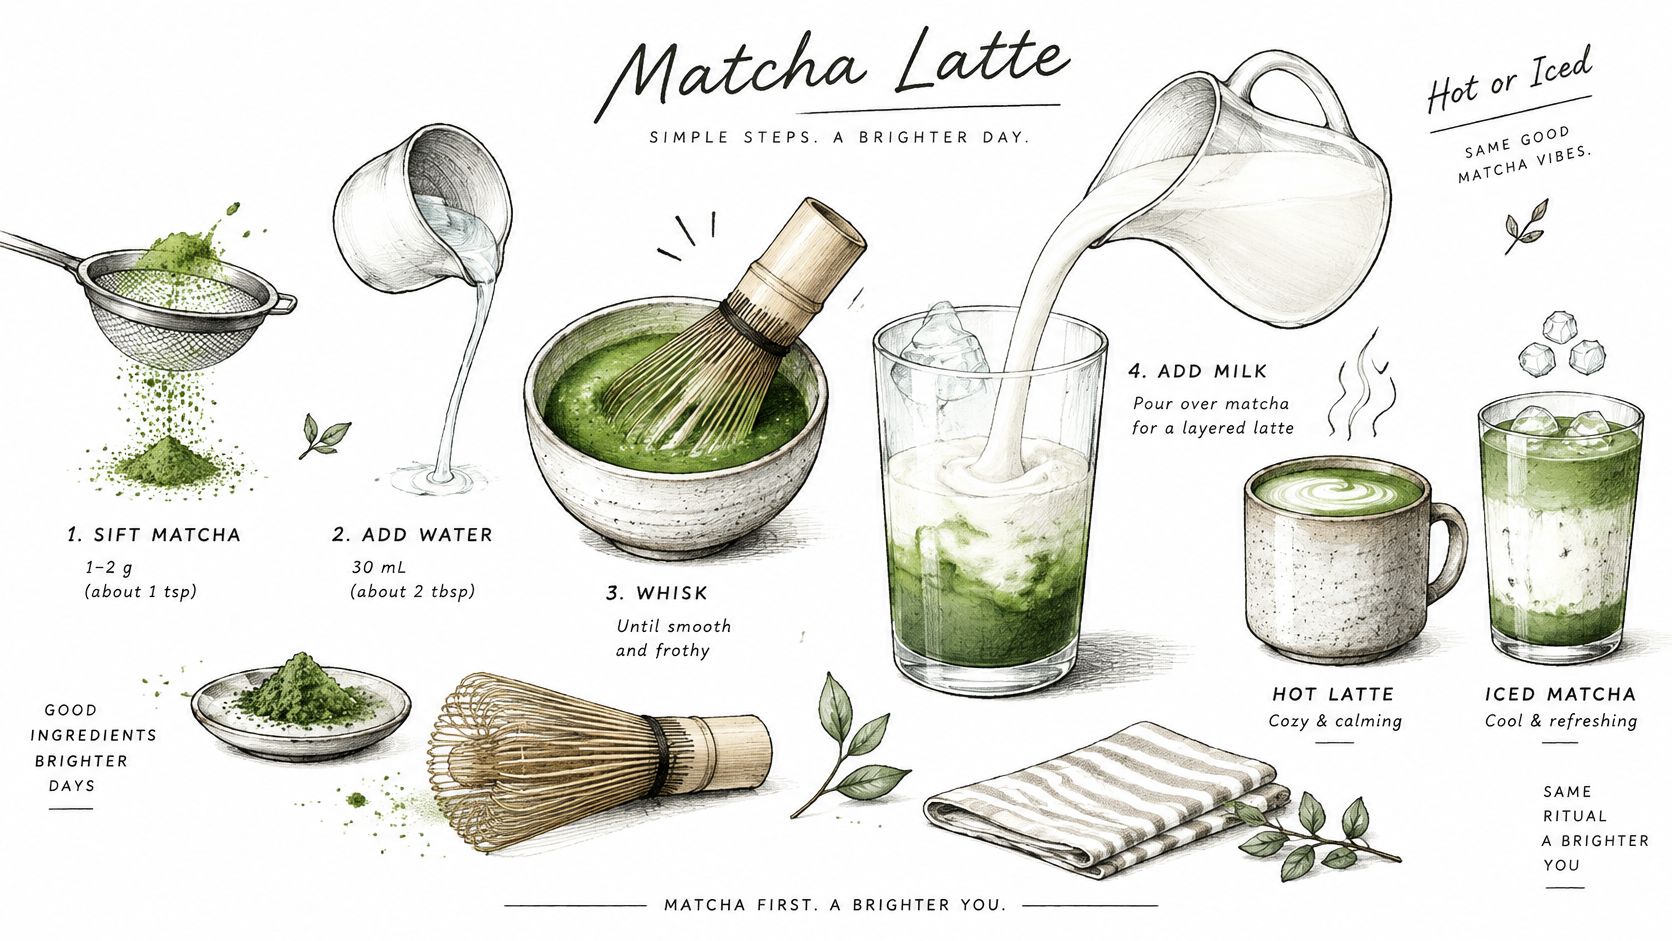
Milk cannot disperse dry powder, so every latte and iced drink starts with a water-based concentrate. Whisk 2 g of sifted matcha with 30 mL of water at 70-80°C until smooth, then build the finished drink on top of it. Powder shaken straight into cold milk clumps and sinks, because the outside of each lump gets wet while the centre stays dry, and the drink ends up flavoured unevenly.
The image below shows the concentrate-first build for a homemade latte, with the matcha dispersed before the milk goes in.
Choosing Between a Light and Strong Base
A 2 g base suits a lighter latte where milk softens the matcha and the drink stays easy to finish. Milk, ice melt and a larger cup all dilute the tea, so bigger serves need more presence behind them. A concentrated base of 4.3 g of matcha to 60 mL of water at 70°C, whisked briskly with a bamboo whisk for about 30 seconds, gives roughly 1 g per 14 mL and stays recognisable after dilution. The same concentrate works whether the finished drink goes over hot milk or ice.
A stronger base costs more per serve, can taste heavy in a small cup and raises caffeine because you have more than doubled the powder. I would use 4.3 g only when the finished volume and milk demand it. For a standard home latte, start at 2 g, taste the completed drink and move up by 0.5 g if the matcha disappears under the milk.
Building the Finished Drink
For a hot latte, steam 150-200 mL of milk to about 60-65°C, pour it over the concentrate and stir once to combine. Milk heated much hotter dominates with cooked sweetness and makes the drink less comfortable to sip. For an iced matcha, fill the glass with ice, pour the concentrate over it, add 150 mL of cold milk or water and stir well. If the ice will melt during a slow drink, weigh a slightly stronger base in advance, and record the extra grams rather than adding an anonymous scoop.
The video below is useful for checking the order of operations and the consistency you are aiming for before milk or ice enters the glass.
Taste the concentrate on its own before you add milk. It should be smooth, vivid and more intense than the finished drink needs to be, because milk only ever dilutes it. If it already tastes thin, add 0.5 g to the next base rather than reaching for sweetener.
Fixing Lumps, Bitterness and Weak Foam
When a bowl goes wrong, change one variable and weigh the difference. Because matcha is fully consumed, grams set strength, texture and caffeine, while water temperature decides whether those grams taste sweet or scorched. Use water in the 70-80°C range rather than boiling; hotter water makes the same dose harsher before technique has a chance to help.
If lumps keep returning, go back to the sift-and-paste step instead of chasing clumps after dilution. Once the full volume is in the bowl, the whisk tends to push dry pockets around rather than break them apart.
Matching the Symptom to the Fix
| Symptom | Likely cause | Fix |
|---|---|---|
| Lumps that will not dissolve | Powder not sifted or too little water first | Return to sifted powder and a smooth paste before topping up |
| Bitter, harsh taste | Water too hot or dose high for the bowl | Cool the next bowl toward 70-80°C and trim the weighed dose slightly |
| Flat, thin foam | Whisk pressed into the base or slow circular strokes | Keep the tines near the surface and use light zig-zag strokes |
| Dull or yellowish colour | Old powder or poor storage | Check the date; store sealed, cool and dark |
| Gritty sediment | Unsifted clumps or coarse powder | Sift again and choose a finely milled matcha |
| Too strong or cloying | Too much powder for the volume | Lower the weighed dose slightly or add liquid |
| Thin, grassy taste | Too little powder | Increase the weighed dose slightly while holding water volume fixed |
For bitterness, reach for heat and mass before sweetness. Make the next bowl cooler and a little lighter, and keep the liquid volume constant so the change is readable. If harshness survives a cooler, leaner bowl, suspect stale powder rather than a flawed wrist.
Weak foam is usually mechanics: slow strokes, tight circles, or tines digging into the base. Check for broken or warped tines, use a bowl wide enough for a full stroke and keep the whisk moving across the surface. Very large bubbles that vanish quickly point to uneven dispersion, so fix suspension before adding more matcha.
Storage check: Keep opened matcha sealed, cool and dark, and aim to use the pouch within about a month or two before colour and aroma fade.
Separate quick fixes from replacement problems. Temperature, dose, sifting and whisk pressure can be corrected in the next bowl. Yellow colour, flat aroma and persistent harshness after careful preparation point to the powder itself, so avoid raising the grams to compensate; that increases caffeine and cost while making a stale flavour stronger.
Choosing Grade and Baking with Culinary Matcha
Choose the grade according to what else will compete with the tea. Ceremonial matcha is for traditional whisked tea, while culinary matcha is for a bolder flavour in lattes, pancakes and baked treats. That distinction isn't snobbery. Butter, sugar, flour, milk and oven heat all blunt delicate notes, so the powder that tastes best alone in water isn't always the powder that survives a recipe.
Ceremonial Grade Matcha is delicate, umami-rich and well balanced with strong intensity, and it's used for traditional whisked matcha and pure sipping. In usucha, you can taste its sweetness, texture and finish without interference. In a biscuit, much of that nuance disappears and heat can dull both colour and flavour, which makes ceremonial powder an expensive way to colour dough. Save it for drinking when the preparation is just powder and water.
The comparison below shows the practical split between whisking ceremonial matcha for sipping and using culinary matcha where milk, batter or heat enters the recipe.

Culinary matcha earns its place by staying present. Its bolder, earthier character holds up in a latte and gives baked goods a recognisable tea flavour rather than a faint green tint. That depth can taste coarse when whisked alone, especially at a high dose, so don't judge culinary powder by a straight bowl and then assume it will fail in food. Judge each grade in the format it was bought for.
Three Ways to Add Culinary Matcha Without Streaks
- Matcha pancakes: Dissolve the recipe amount in 15-20 mL of warm milk or water, whisk it smooth and stir it through the wet ingredients. This prevents dry green pockets in the batter and spreads flavour evenly.
- Shortbread: Sift matcha with the flour before adding butter. Dry distribution gives even colour through the dough and avoids dark streaks that appear when powder is kneaded in at the end.
- Smoothies: Blend matcha with the liquid first, then add fruit and ice. Powder added last can stick to the blade housing or form clumps on frozen ingredients instead of dispersing.
For icings, creams and glazes, add matcha late and mix only until the colour is even. Prolonged heat turns bright green toward olive, so avoid long, hot baking where the recipe allows a shorter cook or a matcha finish after baking. A dusting, filling or icing often preserves colour better than putting all the powder into a batter that spends a long time in the oven.
Adjust recipes by 0.5 g per batch, not a whole extra teaspoon. A teaspoon jump can move a biscuit from balanced to bitter and makes it impossible to know the threshold where flavour turned. Our best matcha cookies recipe for home baking gives you a controlled starting point for testing that half-gram change in a familiar dough. Weigh the matcha separately from the flour, even when the method later sifts them together.
A One Week Calibration Plan
Spend one week fixing your personal serve instead of collecting unrelated recipes. On day one, brew usucha with the 2 g weigh and record water volume, temperature and taste. On another day, make one latte from a 2 g concentrate and note whether the matcha remains present after milk is added. Later in the week, repeat the format you liked least with a 0.5 g change in the direction your notes suggest.
Keep the log simple: grams, liquid volume, temperature, grade and one taste comment. You're looking for the point where the drink is vivid and full without becoming heavy, harsh or wastefully strong. Change one variable at a time until the bowl suits you, then keep those numbers as your house recipe. That record is the difference between a good bowl you happened to make once and matcha green tea preparation you can repeat on a busy morning.
Visit TOO MATCHA. to choose ceremonial matcha for whisked bowls, culinary matcha for lattes and baking, or sweet matcha for quicker drinks, all with grades and formats matched to how you prepare them. Start with the grams and temperatures that worked in your calibration log, add the whisk and bowl kit if your current tools are limiting the foam, and build your next order around the serve you've already proven at home.